April 202015 min read
How to Enhance Your Travel Photos With Lightroom
In short
To enhance travel photos quickly, I shoot in RAW and process them in Lightroom with one preset: lower highlights, raise shadows, add clarity, fixed sharpening and noise reduction, lens corrections and a Fuji color profile. I batch-apply it, then only crop and set whites and blacks on each photo, which takes me about 15 minutes per 100 photos.
To enhance travel photos quickly, shoot in RAW and process them in Adobe Photoshop Lightroom with a simple routine: lower the highlights, raise the shadows, add a little clarity, apply fixed sharpening, noise reduction and lens corrections, and pick a color profile. Save it all as a preset, apply it in bulk, and only crop and set whites and blacks on each photo. That is how I processed 25,000 photos from our world trip.
Photography and travel go hand in hand: photos capture the moments we want to remember. I would be sorry not to have beautiful pictures to show my children of the world tour they completed at a very young age.
Of course, good photos start with a good camera and knowing how to use it. But one step is often overlooked, even though it brings out the full potential of your camera: post-processing, which can turn a good image into an exceptional one.
That is why, in this article, I want to show you how I work with Lightroom, and how easy it is to get much better photos with it.
Disclosure
Some of the links below are affiliate links, meaning, at no additional cost to you, we will earn a commission if you click through and make a purchase. Your support is truly appreciated.
The Basics of Photo Processing
What Does #nofilter Really Mean?
We’ve all seen it, and maybe done it: take a photo of a gorgeous sunset with a smartphone and post it on Facebook with the #nofilter hashtag. The hashtag suggests the photo shows exactly what we saw at that moment, with no editing, no processing, no effect… no filter whatsoever.
Originally, #nofilter simply meant that no Instagram filter had been used. But the hashtag has been used every which way, to the point of becoming absurd.
The problem is this: #nofilter means nothing in digital photography.
Every photo that comes out of a camera or smartphone goes through a series of transformations, processing and filtering operations. Their parameters are set in the device’s menus, and even the so-called “neutral” or “standard” settings are chosen by the manufacturer.
The best-known settings include white balance, dynamic range, shadows, highlights, contrast, color, saturation, temperature, sharpness, noise reduction and texture, not to mention the many color profiles (natural, vivid, black and white, sepia, etc.) provided by manufacturers.
Some of these settings are built into the camera, others can be changed by the user. Your camera or smartphone is in fact a small computer running a program that processes the pictures captured by the lens.
That is why two cameras from two different manufacturers, capturing the same scene at the same moment, will not produce the same result.
The end result never exactly matches what we perceived when we pressed the shutter. Those who know how to use these settings to convey the magic of the moment have already turned photography into an art… even if, in real life, photography can embellish reality in many ways.
RAW or JPEG: What Is the Difference?
You have probably seen the words RAW and JPEG. They are two photo file formats.
JPEG is the most widely used, because it has become the universal format for viewing, sharing and printing images. It is compressed, so it takes up less space. But compression, one image-processing operation among others, also destroys information irreversibly. The image becomes harder to edit.
A JPEG straight out of camera is therefore an image already processed and compressed by the camera.
RAW, on the other hand, means exactly what it says: raw, unprocessed. This format stores all the information collected by the camera’s sensor. You can process the image yourself on your computer, adjusting its settings calmly at home. You are also more likely to rescue a missed shot, for example one taken with the wrong exposure. Once you are happy with the result, you generate your own JPEG, compressing it and discarding the information you no longer need.
Think of RAW as the film negative and JPEG as the print. Not shooting in RAW is like throwing away your negatives after developing them.
RAW has its drawbacks too. Files are bigger, typically more than 30 MB each; the difference with a JPEG reflects the information lost during compression. And a RAW file cannot be used as is: it has to be developed into a JPEG.
My camera lets me record two copies of each photo, one in RAW and one in JPEG, and that is what I do. When I sort my photos, I keep only the JPEGs I find acceptable and the RAWs I want to process. This greatly simplifies my selection.
So instead of letting my camera produce a 10 MB JPEG I’m unlikely to be happy with, I have it generate a 30 MB RAW file, which I process, compress and resize into a 2048px JPEG of just 1 MB that is easy to share.
Below are the RAW and JPEG files produced by my camera. The RAW image looks blurry, and that is normal! Like a rough diamond, it needs processing to reveal its beauty.


And this is what the same RAW image looks like after processing.

Why Use Lightroom to Process RAW Files?
Adobe Photoshop Lightroom (usually just Lightroom), not to be confused with its sibling Adobe Photoshop (or Photoshop), is one of the most popular photo processing programs among professional photographers.
Both are excellent programs that can convert RAW files, but each has its own strengths and features.
In general, Photoshop is built for very advanced editing. It can handle almost any photographic task, and this versatility comes with a steep learning curve.
Lightroom, on the other hand, is built for quick changes. Its interface is easy to use and efficient for organizing and processing photos. With Lightroom, you can apply filters and presets to hundreds or thousands of images at once, in just a few clicks.
I’m also not fond of the word “editing”, which sounds artificial to me. I prefer my photos to look natural, as close to reality as possible. Lightroom can edit photos, but I hardly ever use it that way. That’s why I talk about processing, or developing, rather than editing.
Available on computers as well as on phones and tablets, Lightroom meets the needs of most photographers and has become a professional standard for photo processing.
My Step-by-Step Photo Processing Workflow
During our 444-day world tour, I took 152,000 pictures. I processed 25,000 of them, an average of 56 per day. Without an efficient routine, I would never have got through them all.
Here, step by step, is the workflow I use, which makes the job quick and easy.
Example: a Sunset in Marseille
Sunset is one of the most beautiful moments of the day, but it is hard to capture: the strong contrast between light and shadow requires careful exposure. Without it, bright areas burn out and foreground subjects turn into dark silhouettes.
Before digital cameras, photographers used graduated neutral density filters and other techniques to tone down the sun and reduce the contrast between sky and land.
Today, unless you are a photography purist, you will probably prefer, like me, to shoot sunsets in RAW and use your sensor’s dynamic range to recover the dark areas in Lightroom.
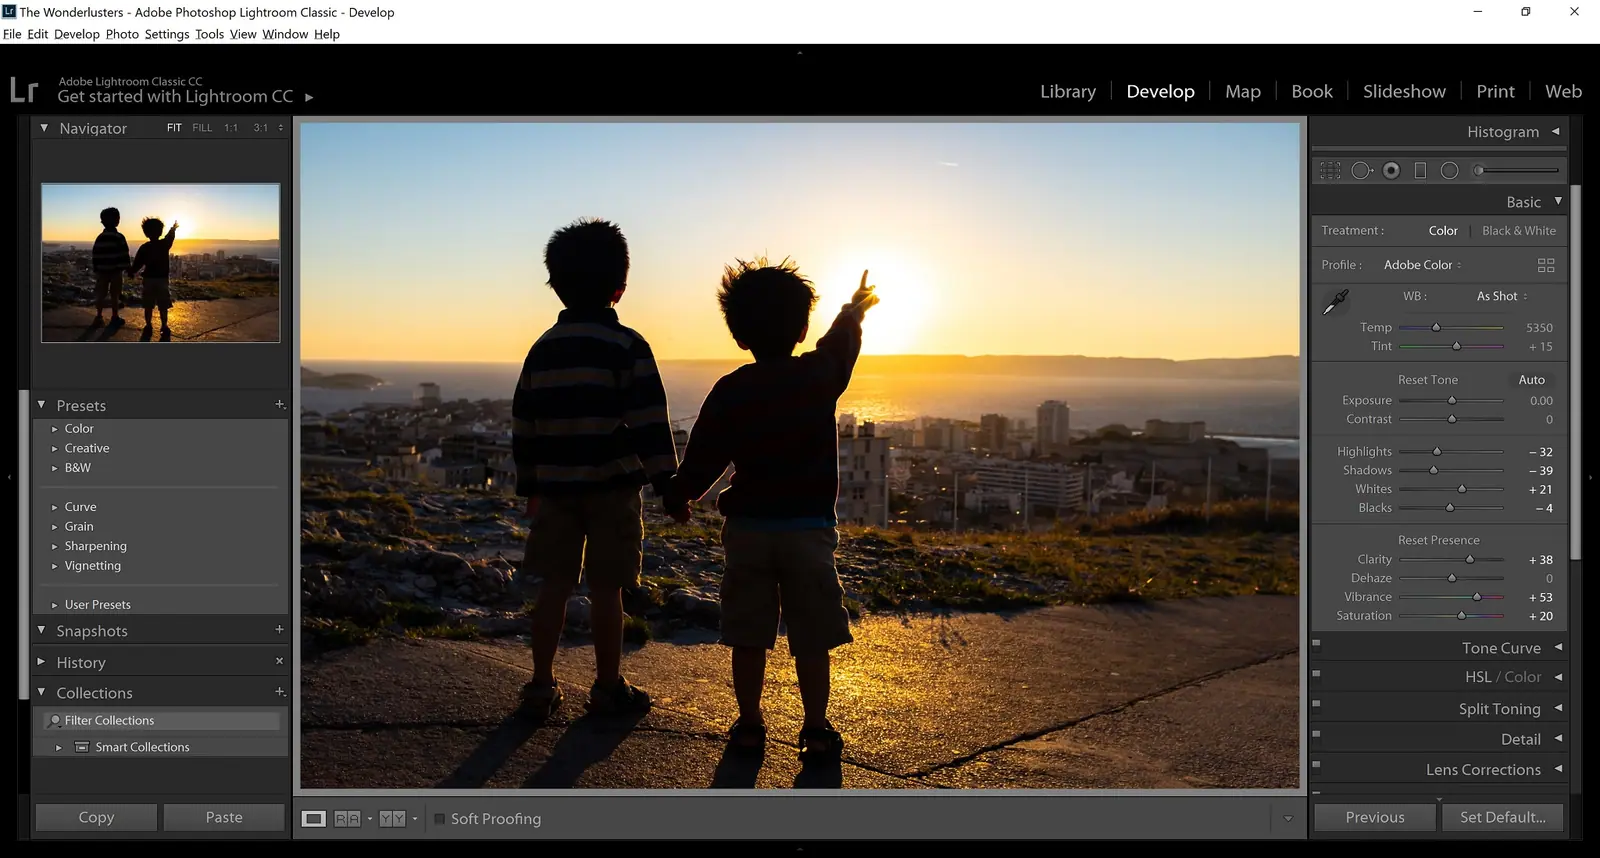
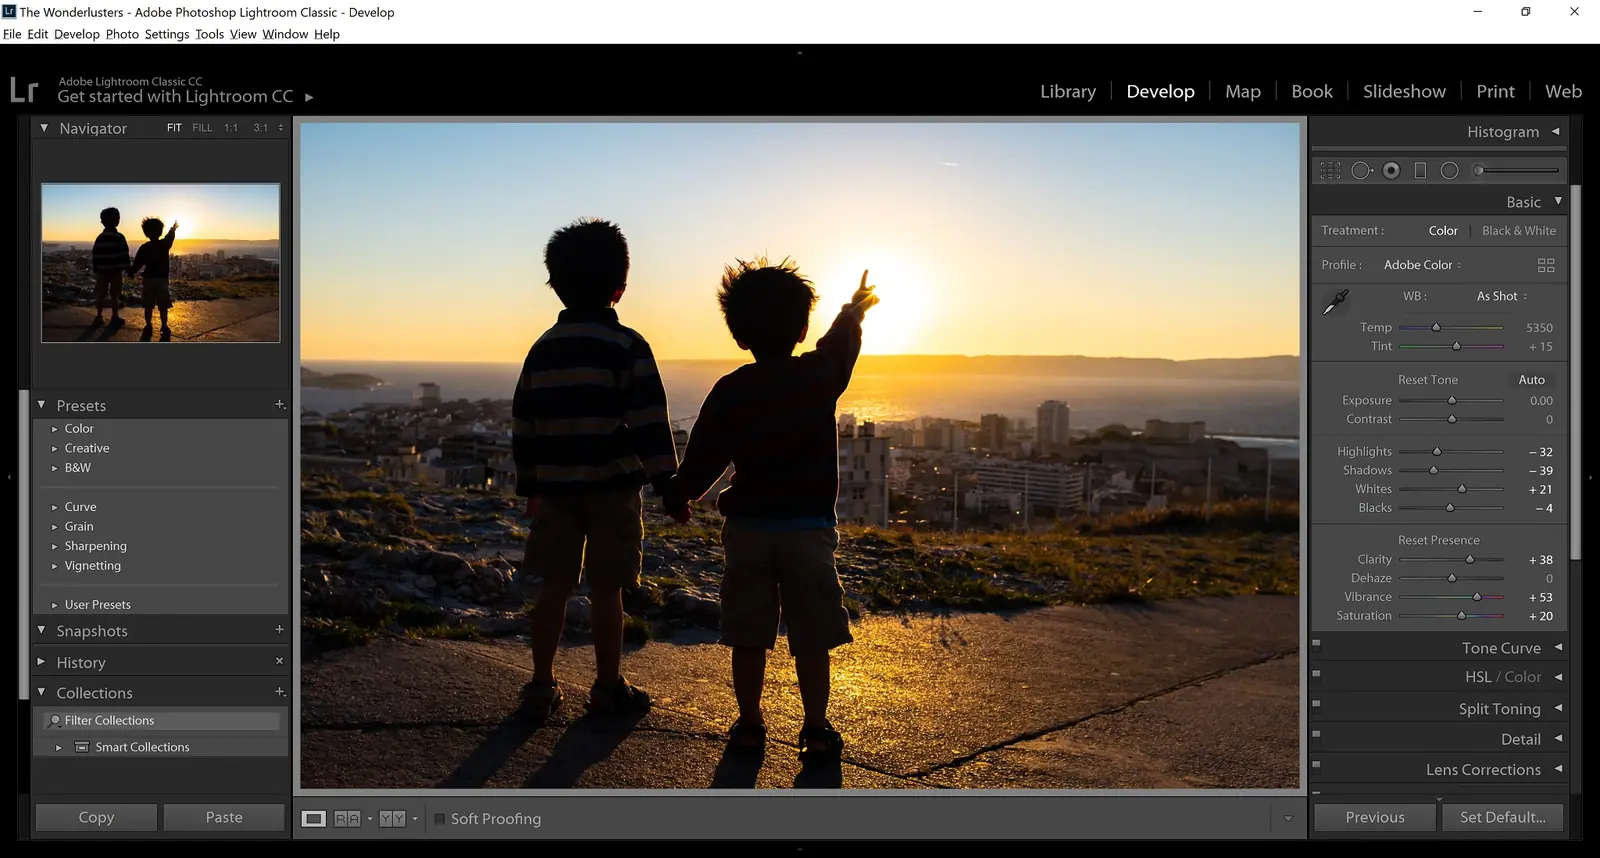
To illustrate my workflow, I’ll use this Wonderlusters photo, taken on a summer evening in 2015 from the heights of the Notre-Dame de la Garde Basilica in Marseille.
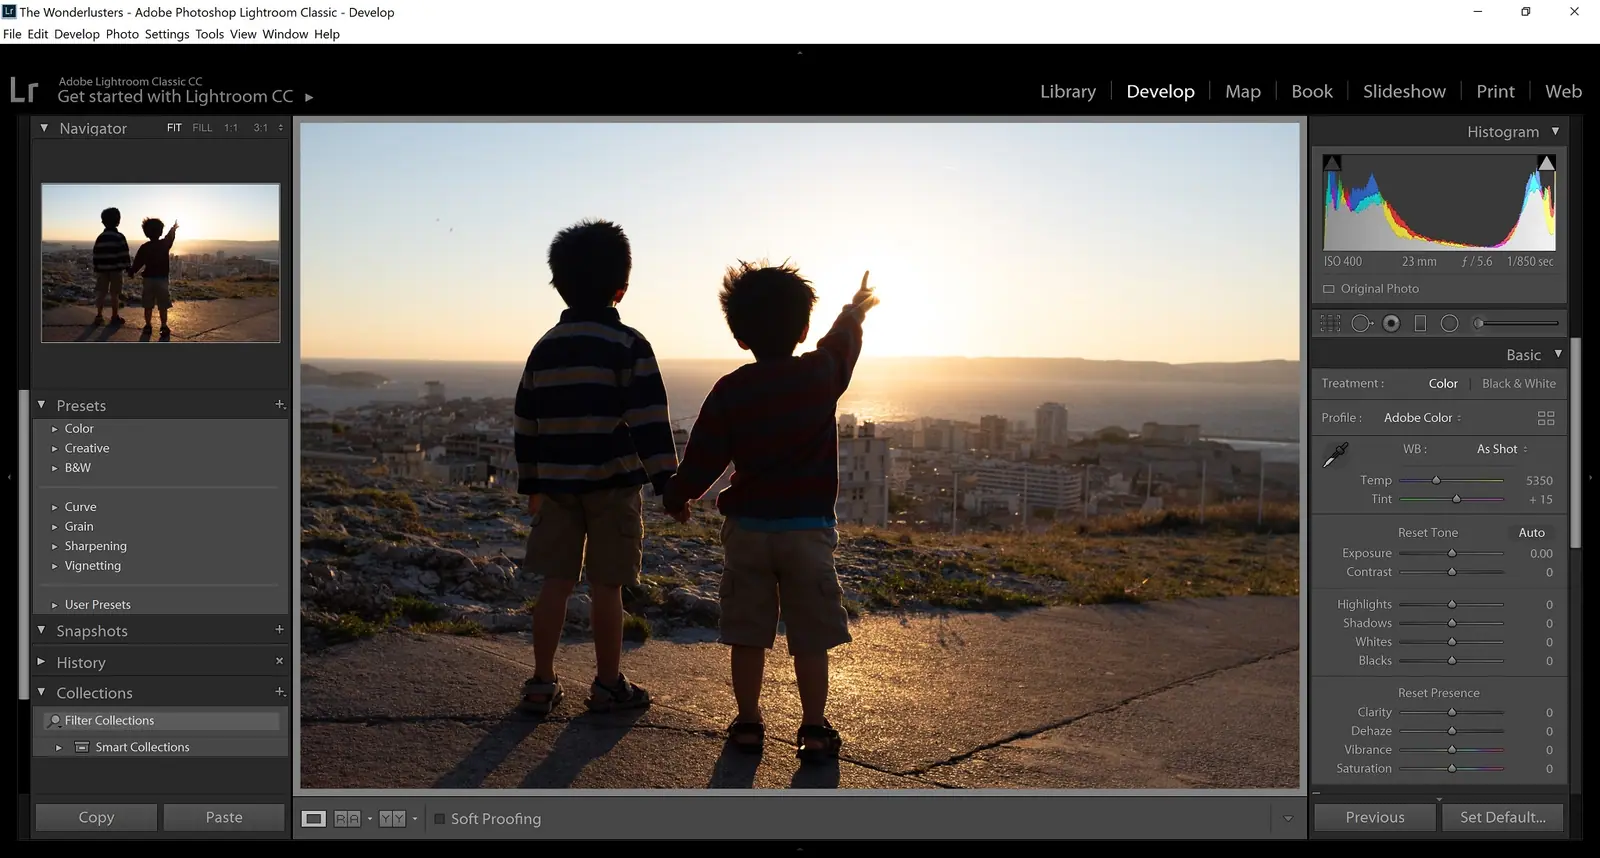
This image, already pretty, is the RAW file with no processing applied. Let me show you, step by step, how to make it exceptional.
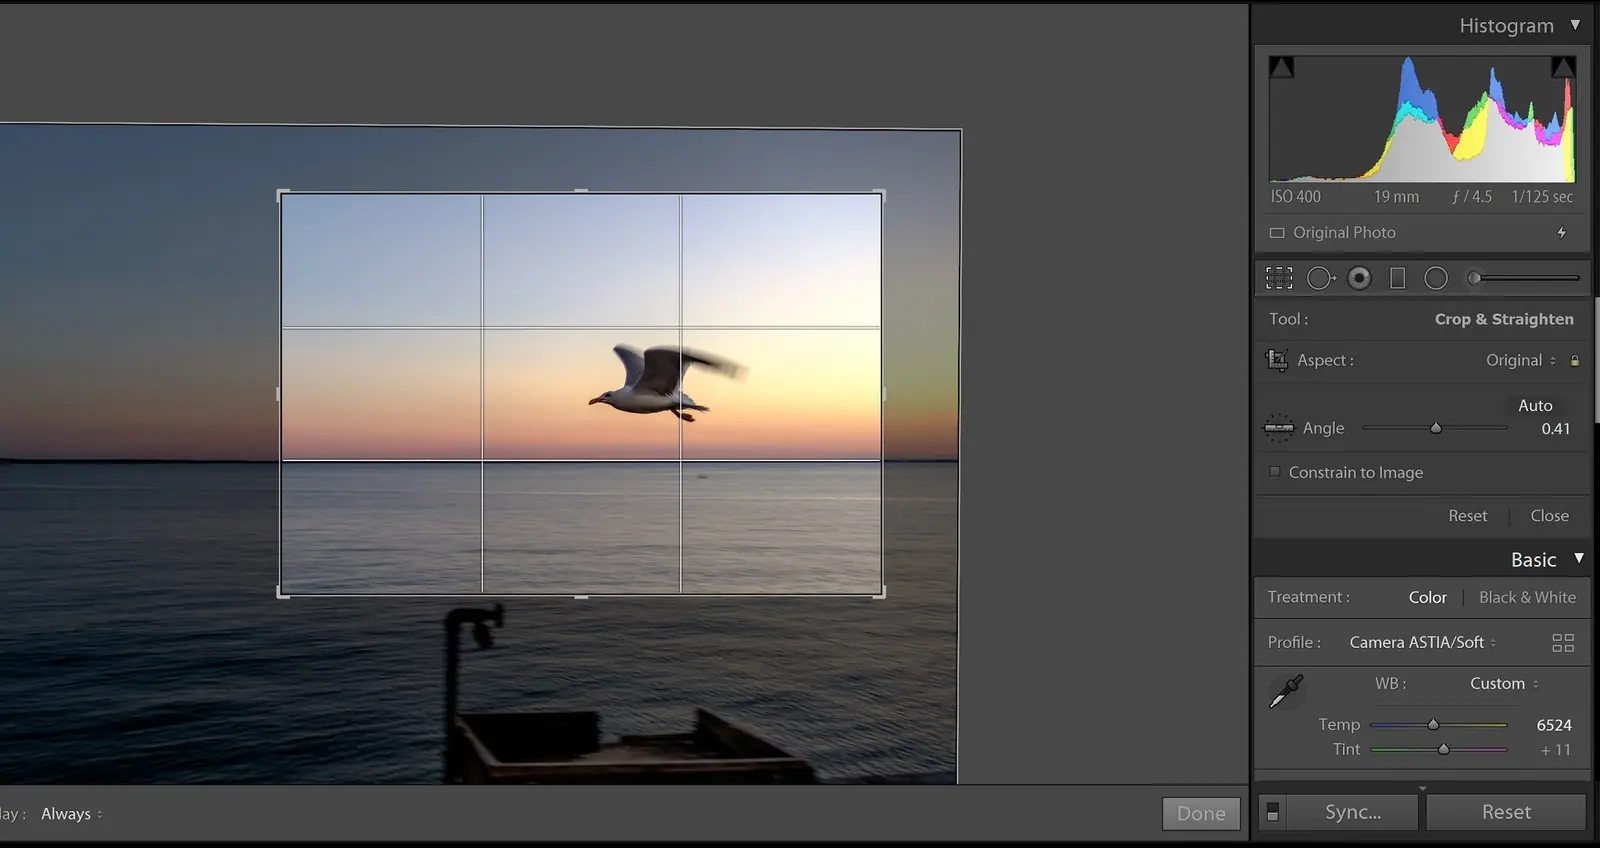
Crop and Straighten
Cropping is an essential step because it improves the composition of the photo in several ways:
- By removing distracting areas;
- By “zooming in” to make a subject stand out;
- By straightening the image to level the horizon.
My camera has a fixed lens, so I cannot zoom. But with a 24-megapixel sensor, I can easily “zoom in” by cropping fairly tight without losing quality.
When cropping, I always level the horizon by straightening the image, as on this scene.
Tone Settings
You don’t need to be a lighting specialist to get the right tone. In automatic mode, your camera often does a great job. But sometimes, perhaps too often for my taste, the image benefits from a small adjustment in Lightroom.
In the Develop module, under the Basic panel, you’ll find six standard tone sliders: Exposure, Contrast, Highlights, Shadows, Whites and Blacks. They range from -100 to +100, with a default value of 0.
2026 update: The modules and panels named in this tutorial (Library, Develop, Basic, Quick Develop) are those of Lightroom Classic. In the other app, now simply called Lightroom, the same six sliders are in the Light panel, and sharpening and noise reduction are in the Detail panel (source).
These are the sliders you will use most: they probably cover 75% of the adjustments your images need.
What they do:
- Exposure: adds or removes light. It corrects an image that is too bright (overexposed) or too dark (underexposed).
- Contrast: controls the difference in brightness between light and dark areas, giving the image more depth or making it flatter.
- Highlights: tones down the brightest areas without affecting the whole image.
- Shadows: lightens or darkens the darkest areas, to hide unwanted details or reveal more.
- Whites and Blacks: set the brightness above (or below) which pixels become overexposed (underexposed). Beyond these limits, colors lose their detail.
There is an “Auto” button that adjusts all six at once, but I prefer to “automate” them my own way:
- Exposure: I very rarely adjust it, because my camera already does an excellent job.
- Contrast: I almost never touch it, except for black-and-white photos, which I rarely do.
- Highlights: 99% of the time, I lower them, because I don’t like photos that are too contrasted. I usually set a value between -90 and -60.
- Shadows: 99% of the time, I raise them, because I like seeing more detail. I usually set a value between +30 and +70.
- Whites and Blacks: I always adjust them last, and let Lightroom set them automatically. My trick: hold down SHIFT and double-click each of the two sliders.
The picture below shows how Lightroom can tone down highlights and brighten shadows. The example is a bit extreme, but it shows how much dynamic range your camera captures and how much information a RAW file stores.
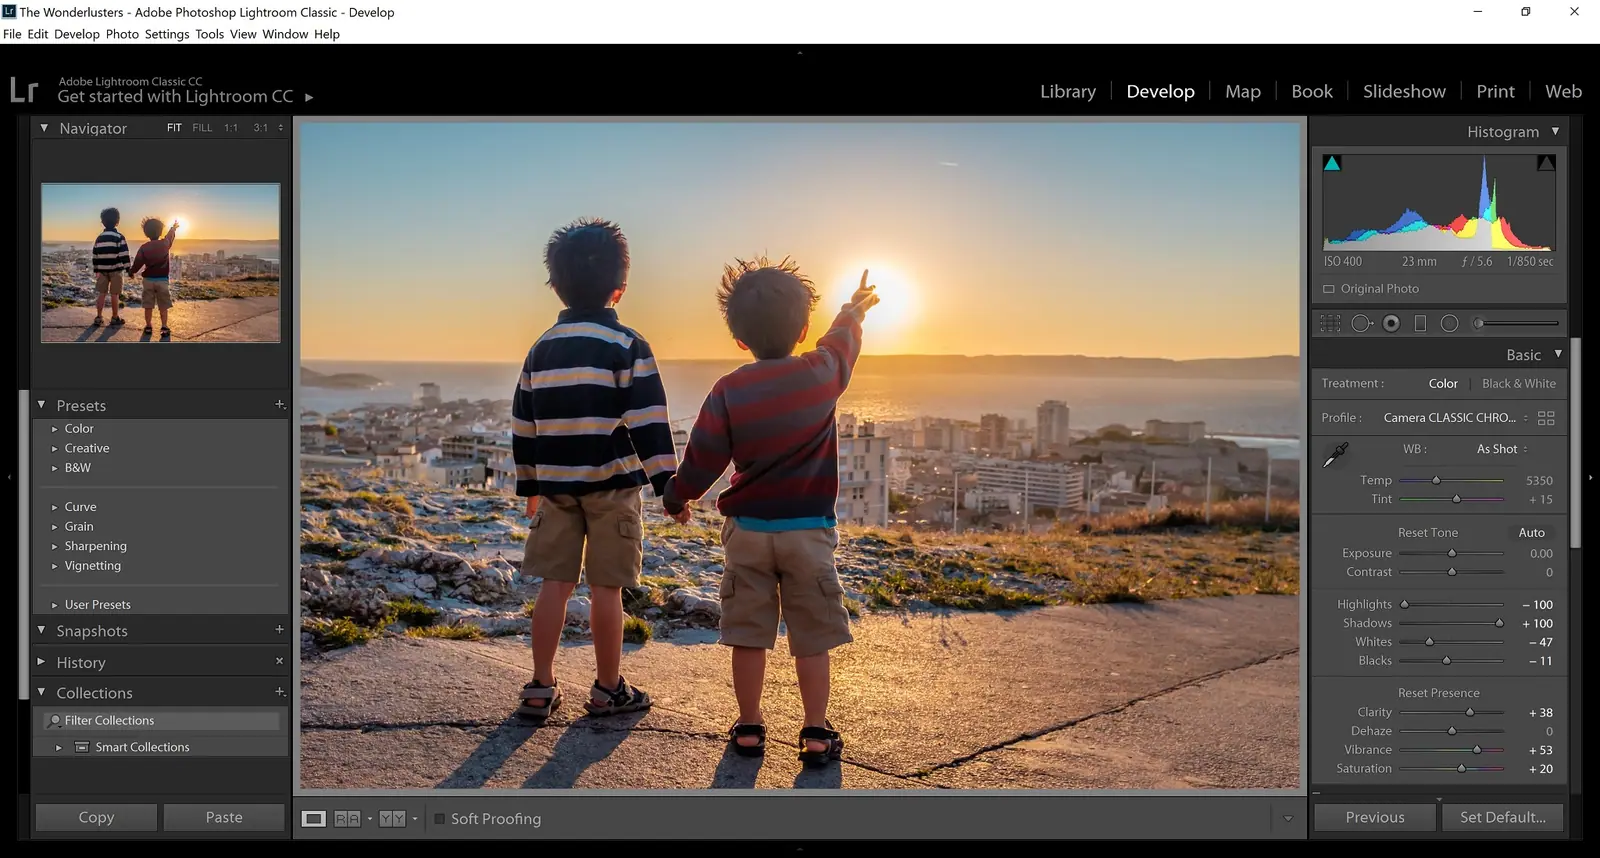
Other Basic Settings: Color and Clarity
The Basic panel also has settings to fine-tune color: Temperature, Tint, Clarity, Vibrance and Saturation.
I won’t go into them in detail, to keep the process simple, and because too much color can spoil the natural look of a photo. Further down, I’ll show you color profiles, which make things even easier.
That said, I always add a touch of clarity, which gives my photos a little more depth and sharpness.
Sharpening and Noise Reduction
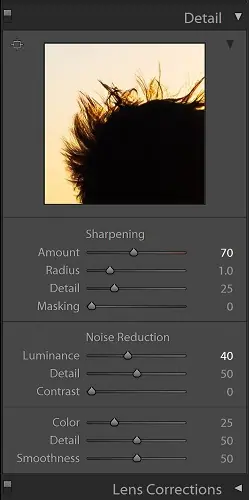
I’m a stickler for detail: I want my photos as sharp as possible, with as little noise as possible. But I don’t want to spend time on it, so I found settings that I apply to all my photos, without exception.
These settings are in the Detail panel:
- Sharpening Amount: 70;
- Noise Reduction Luminance: 40;
- Leave the other sliders at their default values.
Lens Corrections
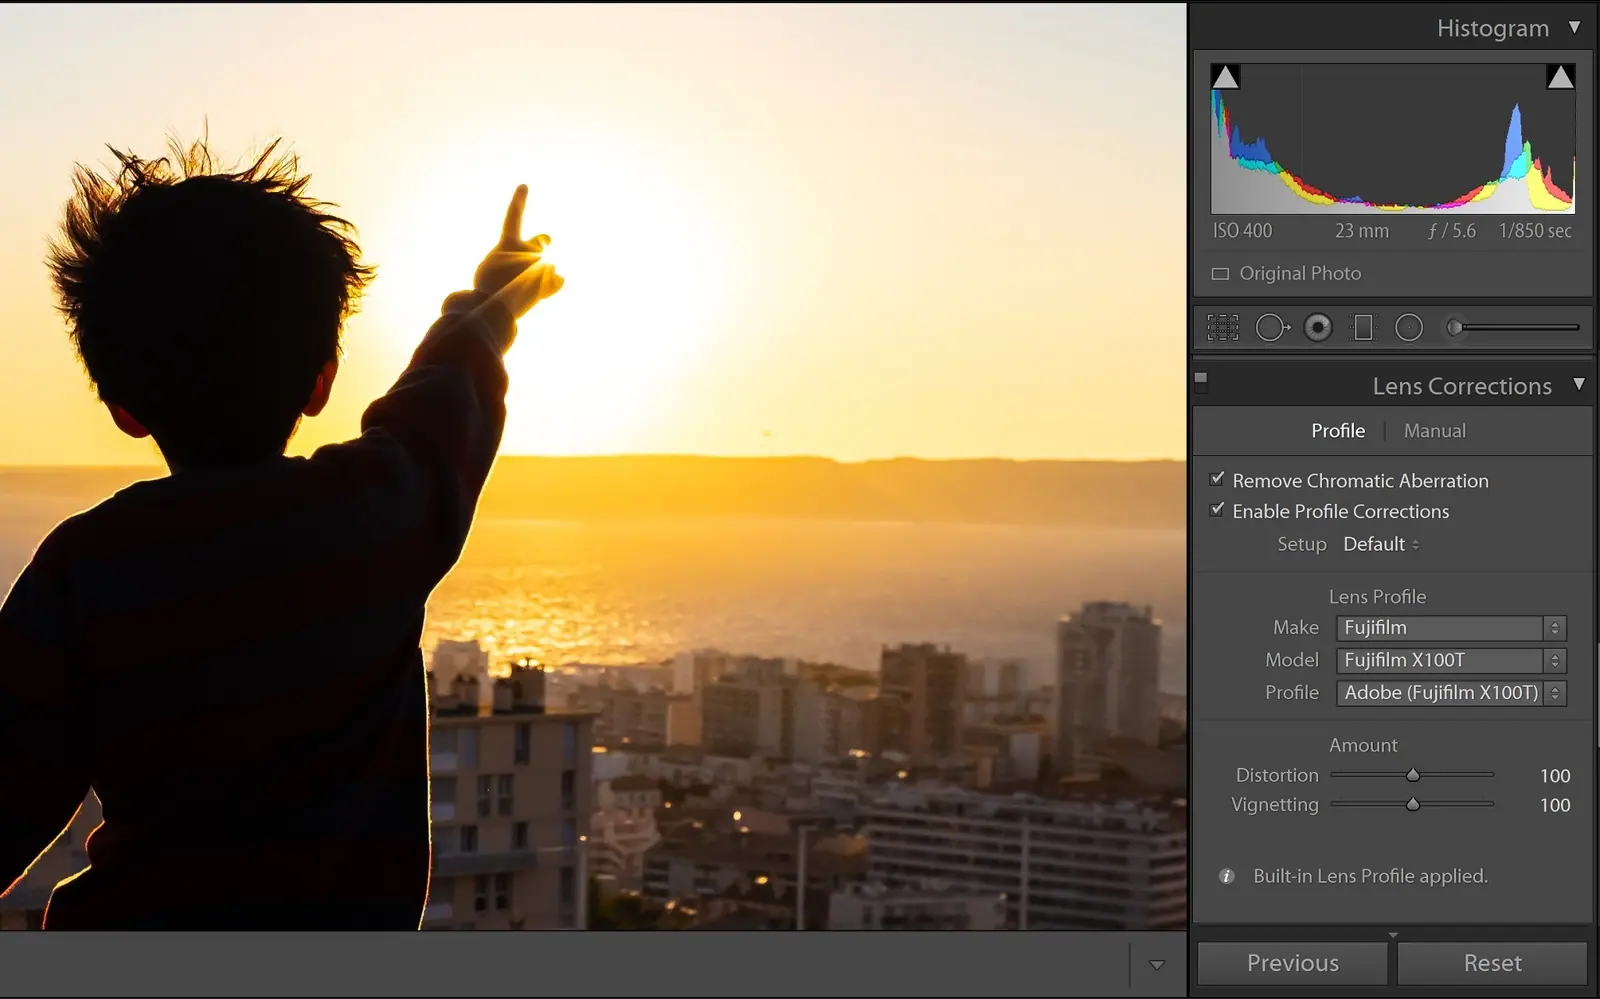
Lens distortion and chromatic aberration are common problems in photography. Lightroom can correct them for you.
As with the details, there is nothing to figure out. Do as I do and always apply the same formula:
- Check “Remove Chromatic Aberration”;
- Check “Enable Profile Corrections”;
- Select the profile for your camera and lens.
Color Profiles
This part of Lightroom can save you a lot of time, and to me, it is reason enough to shoot in RAW.
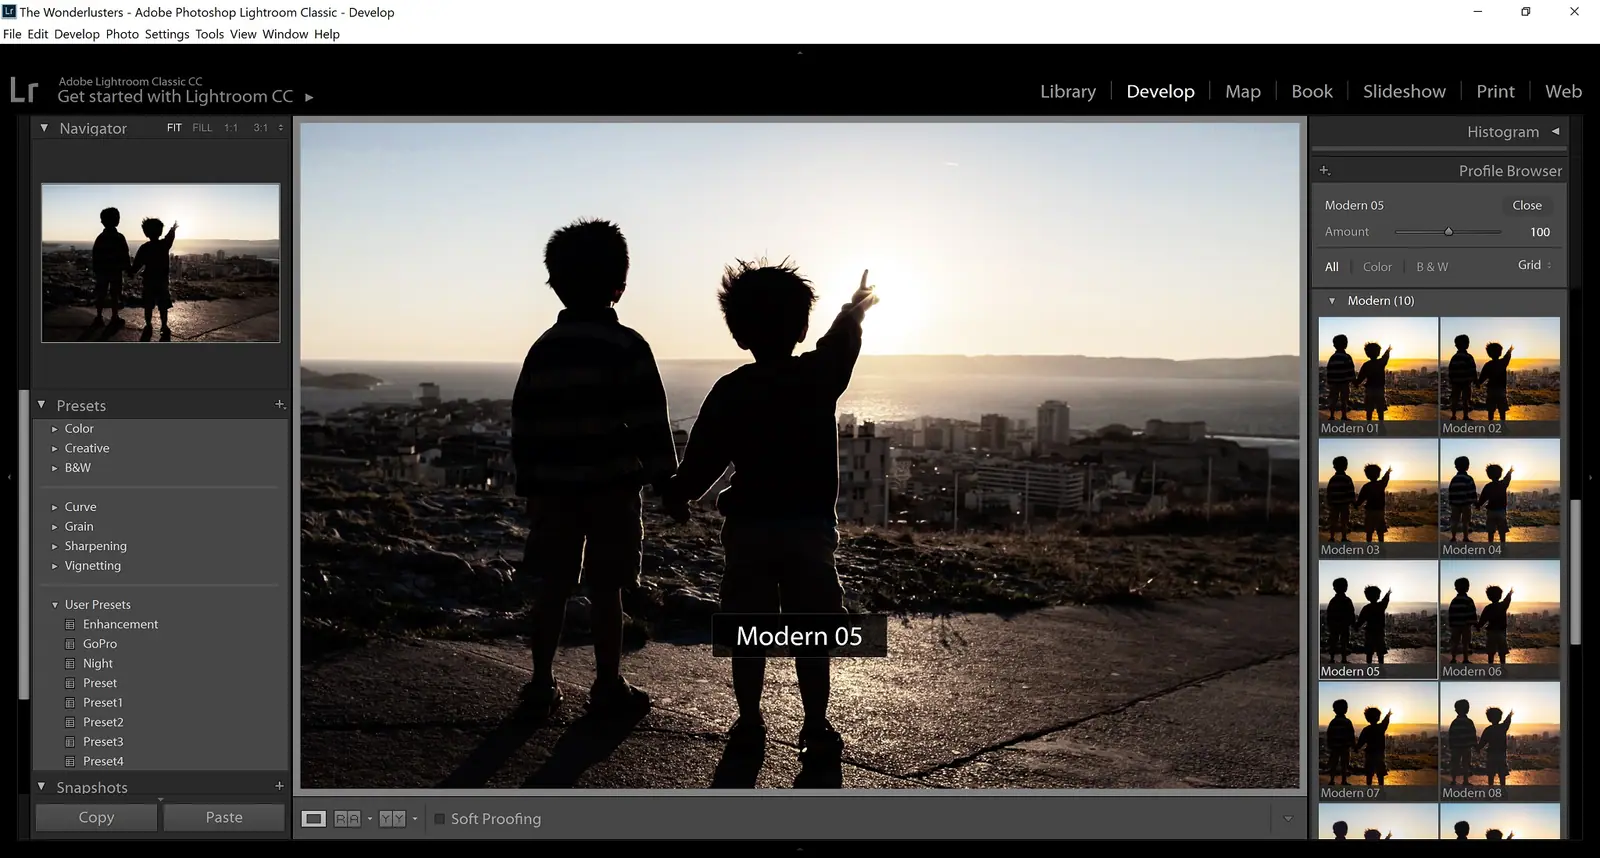
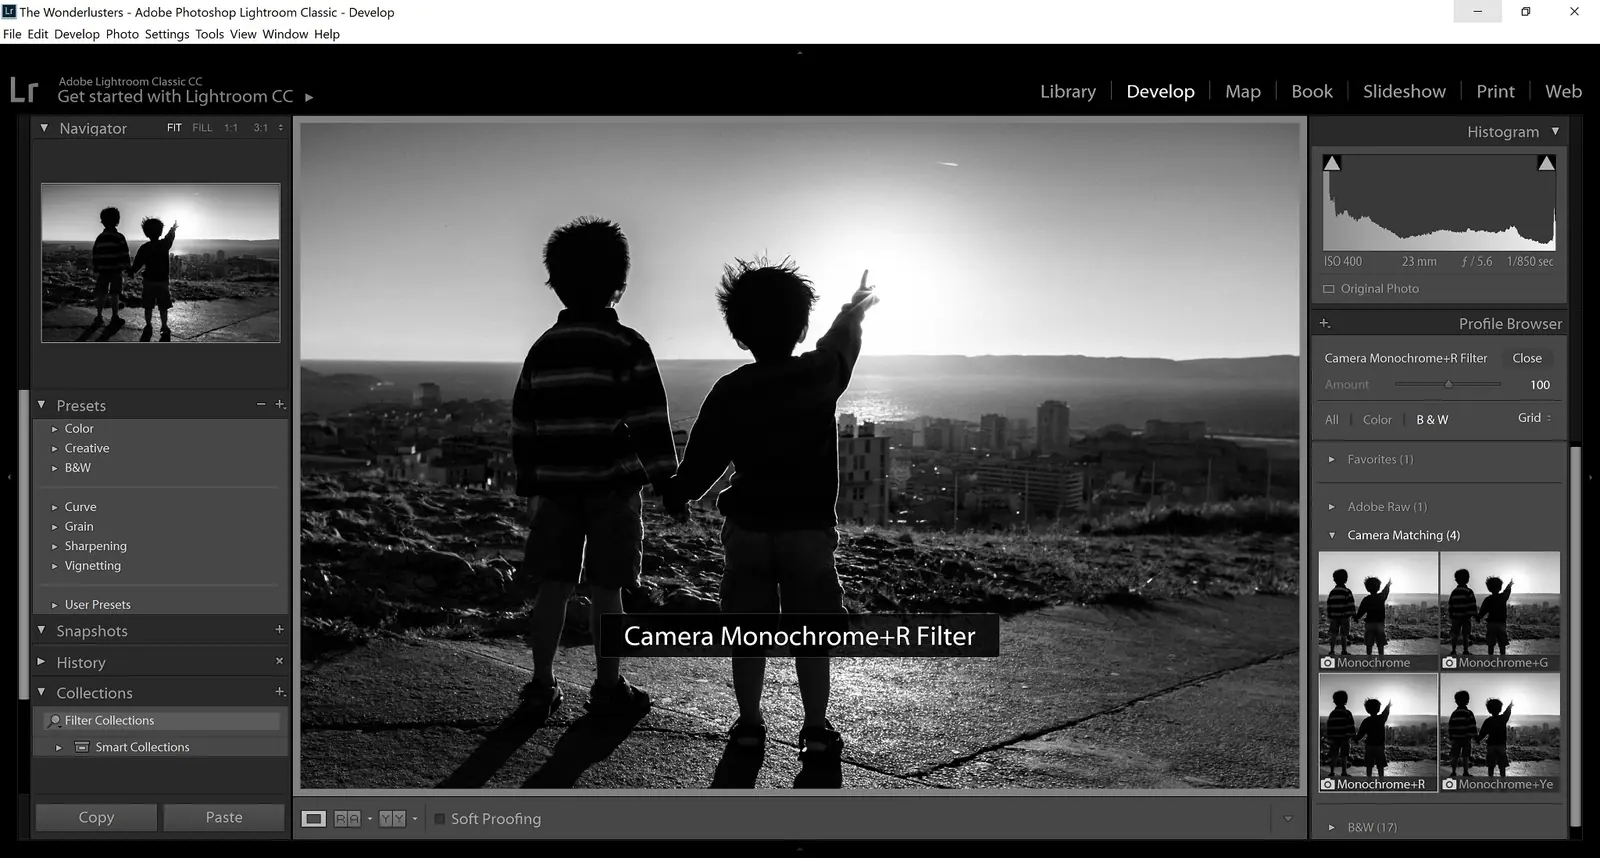
The Profile Browser contains color profiles that emulate camera manufacturers’ film simulations, in addition to Adobe’s own profiles.
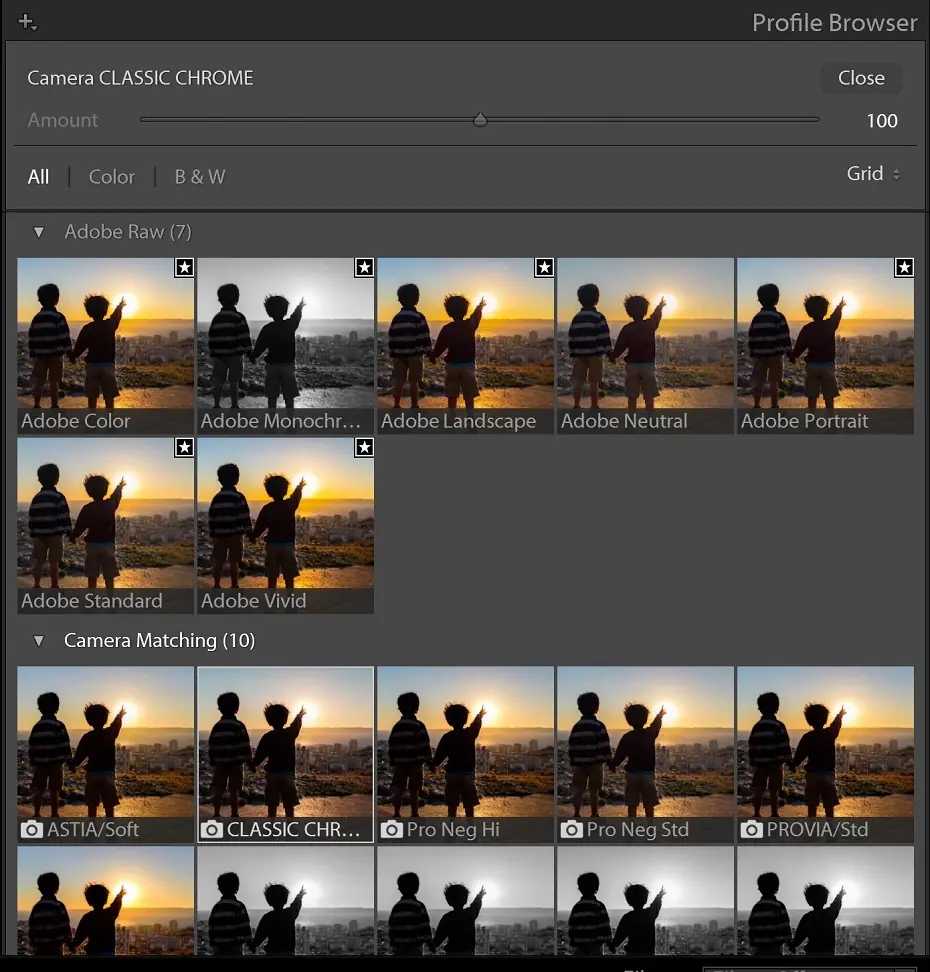
You see, I’m a Fuji fan. Before becoming a leading digital camera brand, Fujifilm made photographic film and was known for its color science.
As a result, Fuji’s color profiles are, to my eye, more nuanced and subtle than those of other manufacturers. Fuji’s “Film Simulation” modes include Provia, Astia, Velvia, Classic Chrome (my favorite), PRO Neg STD, PRO Neg HI, and the superb ACROS black and white.
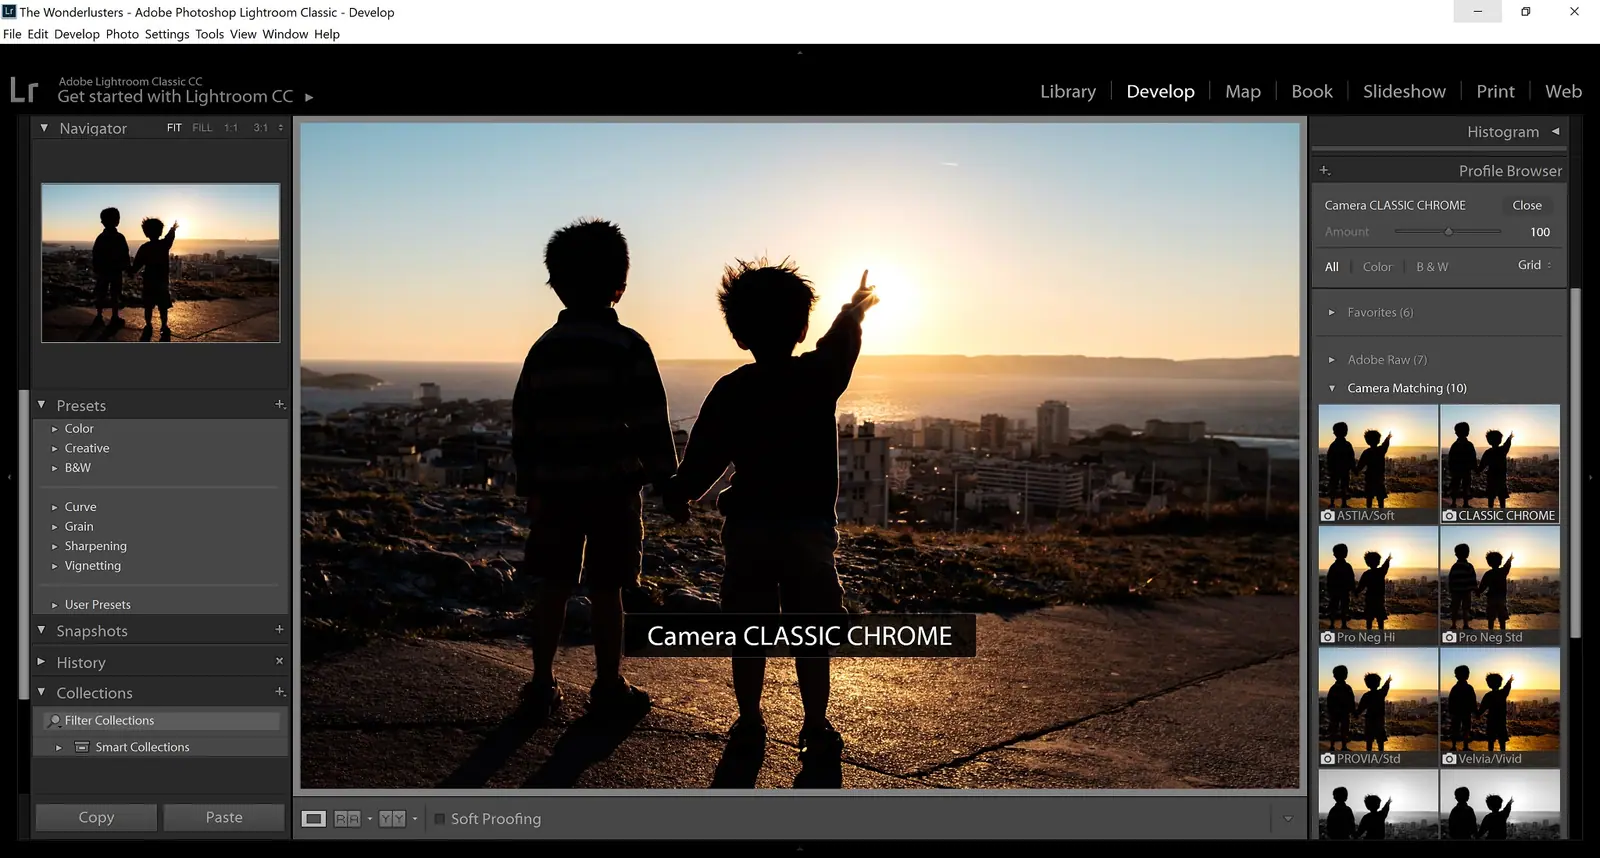
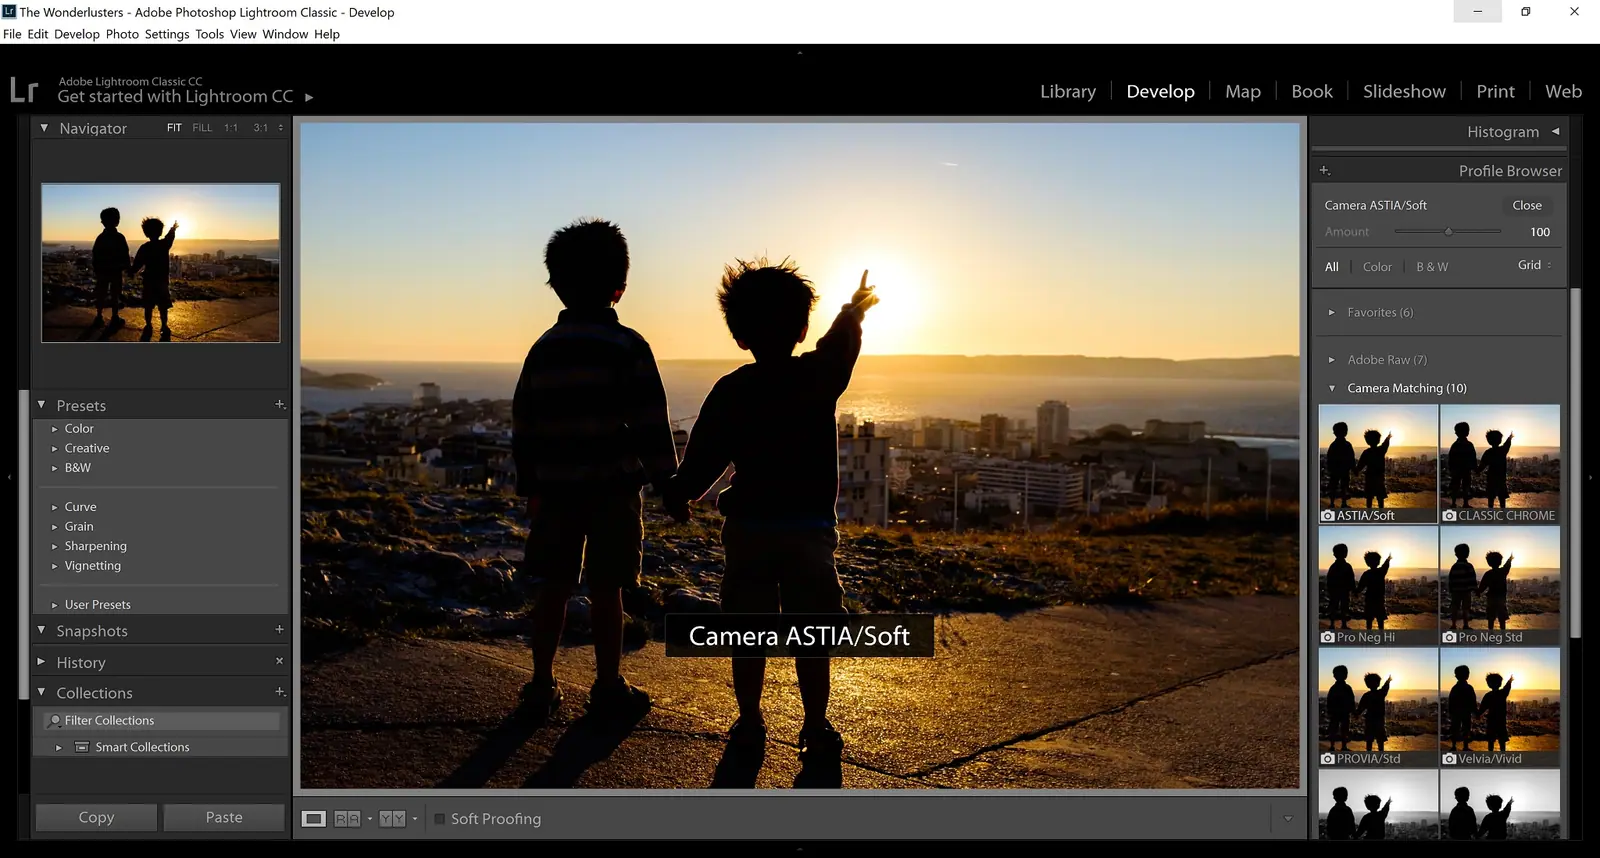
Canon’s equivalent is the “Picture Styles”: Standard, Portrait, Landscape, Neutral, Faithful and Monochrome.
Nikon’s “Picture Control” profiles are Standard, Neutral, Vivid, Monochrome, Portrait, Landscape and Flat.
Sony offers “Creative Styles” such as Standard, Neutral, Clear and Deep.
Choosing one color profile over another can completely change the style of a photo. And in my opinion, Fuji beats its rivals at this game. It is one of the many reasons I chose Fuji.
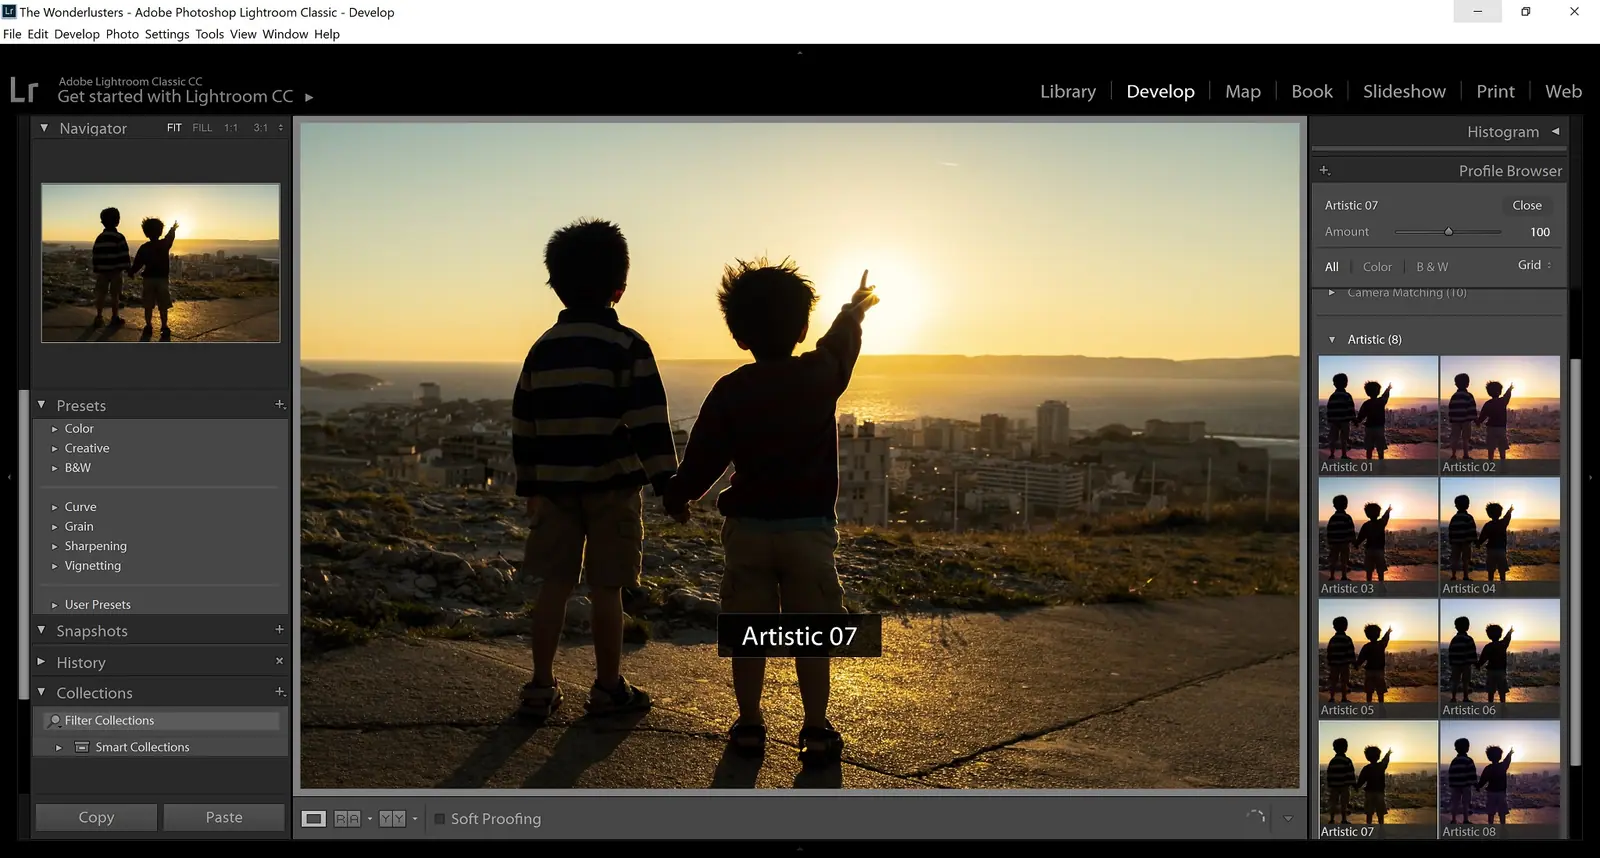
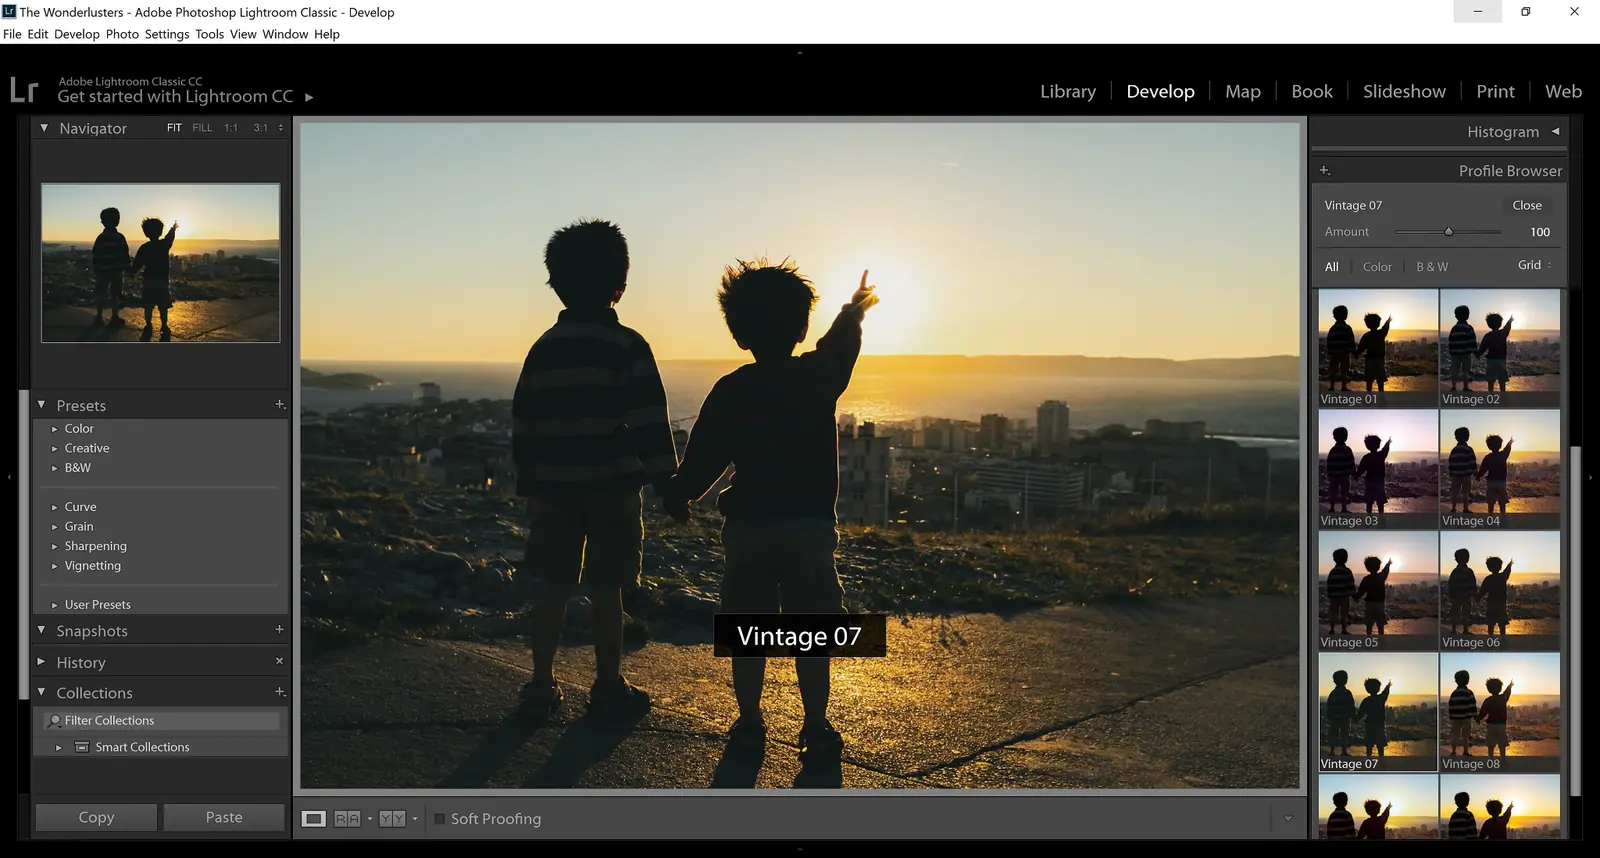
Here are more examples showing how far color profiles can take your creativity.
How to Automate Photo Processing in Lightroom
Would you believe it takes me less than 10 seconds to process each photo? Here is how.
Create a Preset
One of Lightroom’s great strengths is how fast it lets you process images, thanks to presets: saved settings that change the look of your photos in one click. A preset is a shortcut for applying several settings at once.
Unlike color profiles, which completely remap the colors of a photo, a preset is a set of adjustments applied on top of the photo, each one a different setting. The difference may seem minor to a beginner, but it saves a lot of time when you process hundreds of images.
So I created a preset that I apply to all my photos, which automates all the settings described above. To reproduce it, start from an unprocessed photo and apply the following settings:
- Highlights: -80
- Shadows: +50
- Whites: 0
- Blacks: 0
- Clarity: +15
- Sharpening Amount: 70;
- Noise Reduction Luminance: 40;
- Remove Chromatic Aberration;
- Enable Profile Corrections for your camera and lens;
- Select the Classic Chrome color profile if you have a Fuji camera.
Then, without touching any other setting, create a preset with the Ctrl + Shift + N shortcut. The new preset appears in your user presets, in the Presets panel.
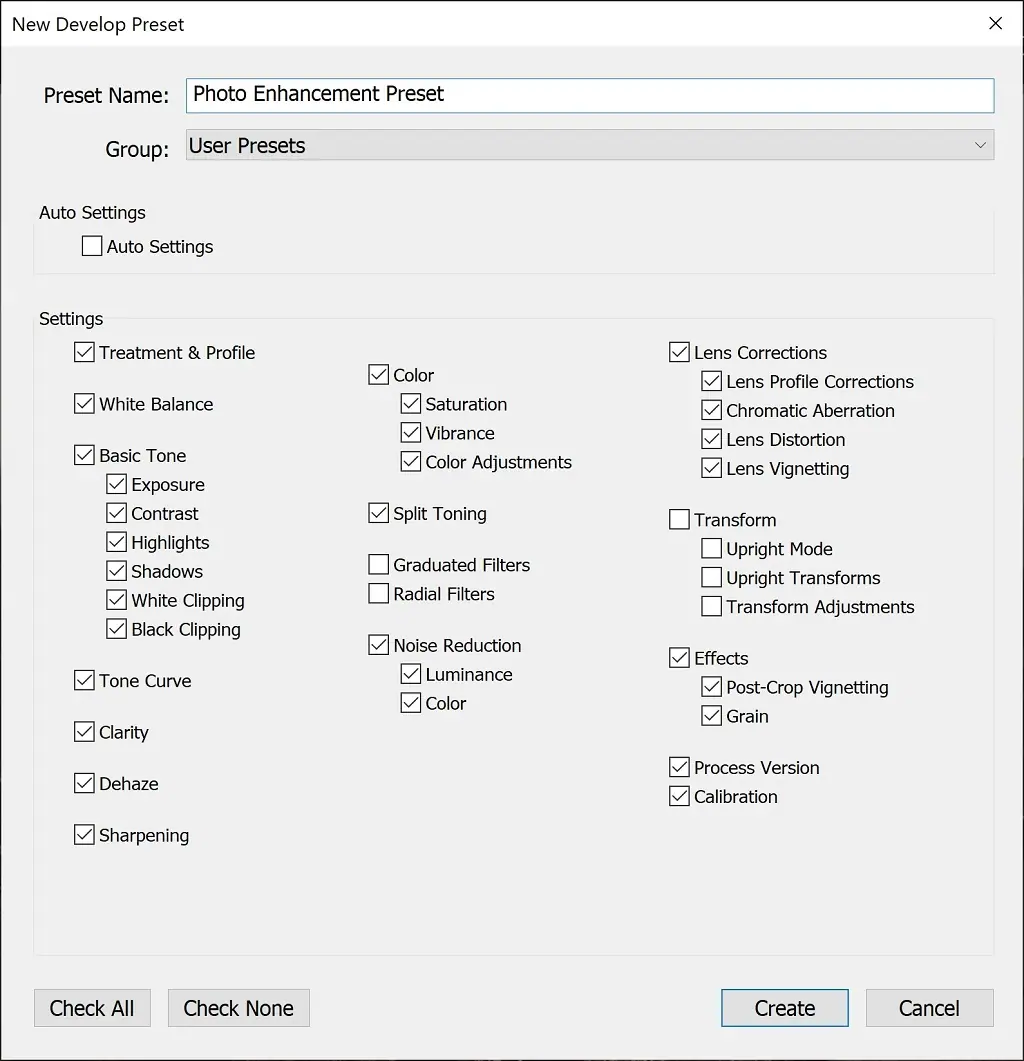
Now all you have to do is use it.
Batch Processing
To save time, I automate my processing routine as much as possible. Instead of processing my images one by one, I process them in bulk.
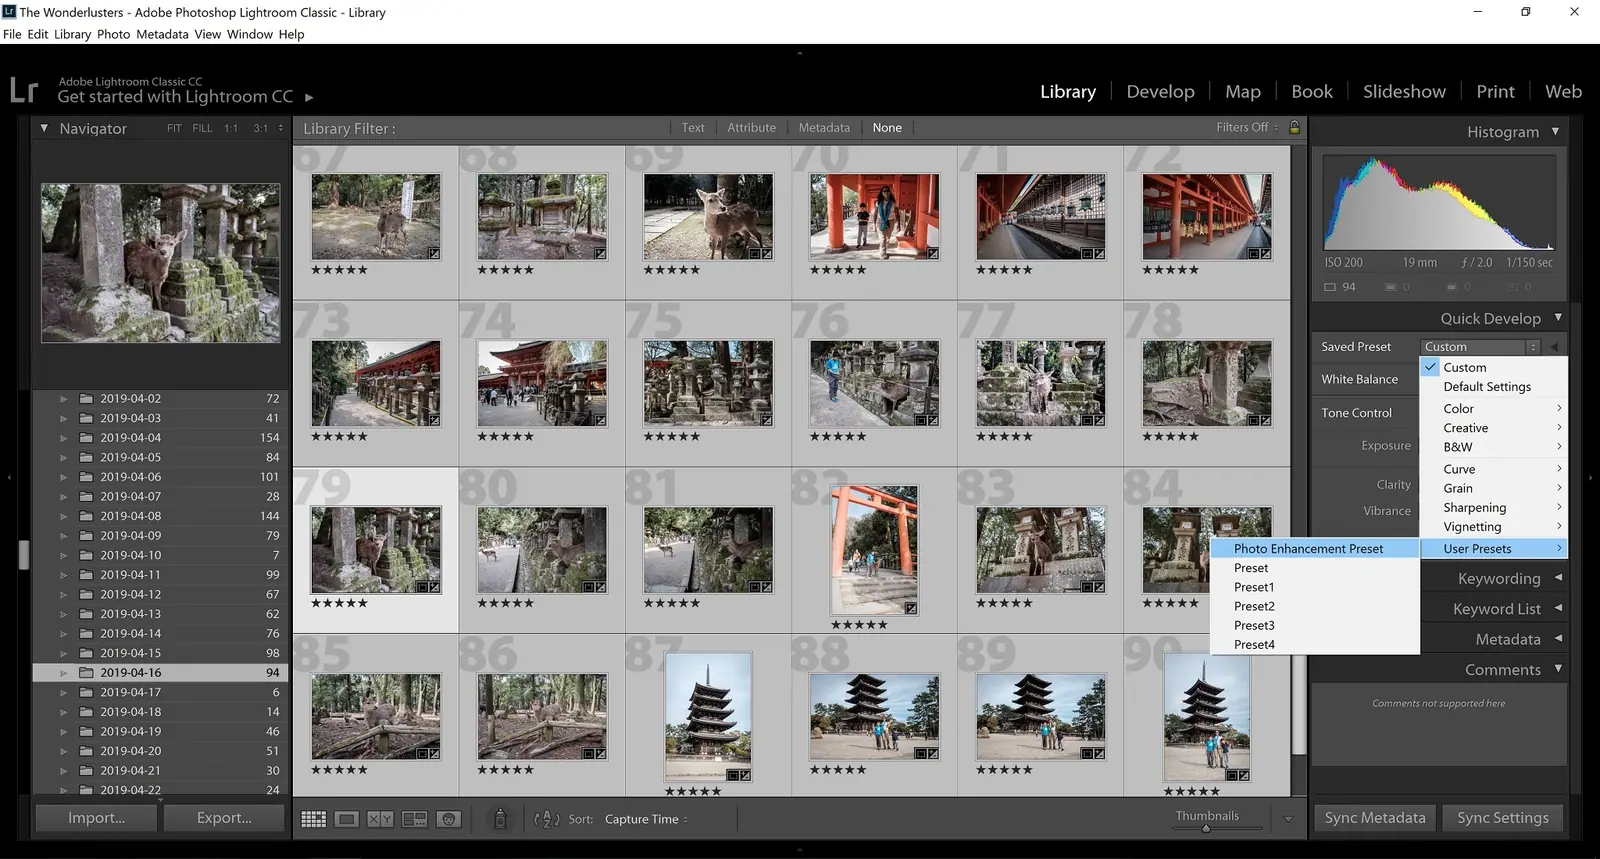
In the Library module, after importing the photos you want to process, select them all and choose your preset in the Quick Develop panel. Lightroom applies it to every photo in a single click.
Final Adjustments, Photo by Photo
Automation only goes so far: there is no magic formula. Some steps still have to be done on each photo individually.
Fortunately, only three adjustments remain, and they usually take me less than 10 seconds per photo.
The first is cropping. Unless you have an eagle eye and the reflexes of a ping-pong player, your photo will often be slightly off. This is especially true if you don’t shoot landscapes exclusively, on a tripod.
You may have noticed that my preset sets Whites and Blacks to 0. That’s because lighting changes with each shot, and so do these two settings. As I mentioned, I always adjust Whites and Blacks last: hold down SHIFT and double-click each of the two sliders to let Lightroom set them automatically.
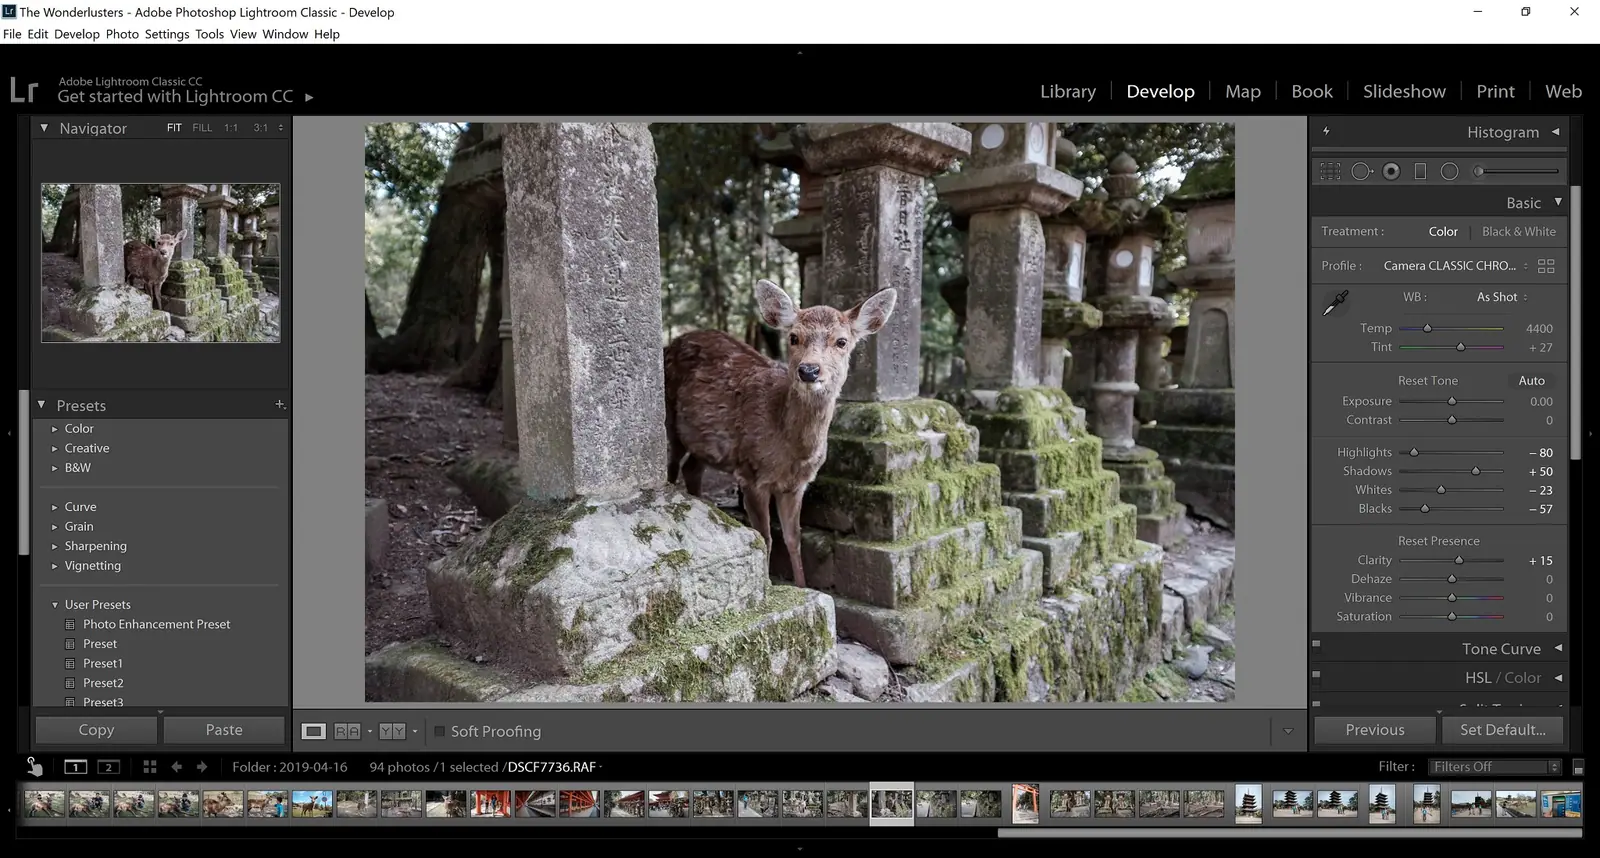
And that’s my photo processing workflow!
My Workflow at a Glance
In short, here is how I process my photos:
- Import the RAW photos to process into Lightroom;
- Batch-apply my favorite preset;
- For each photo: crop and straighten, auto-set whites and blacks;
- Export the photos as JPEGs.
In the end, choosing which photos to process takes me longer than processing them. Once my photos are selected, I need only 15 minutes to process 100 photos, from import to export.
The Limits of My Workflow
Nothing beats automation to save time, but this process has its flaws. My preset won’t suit every photo. That’s normal: it fits my habits and my style.
90% of the time, I shoot during the day, outdoors, in strong natural light. For night, sunset or indoor photos, the preset is not always right. In other lighting, to make the scene look more natural, I might reduce the shadows, add more clarity and vibrance, or switch color profile if Classic Chrome looks too dull.
My settings may also not suit you, which is perfectly normal. In the end, it’s up to you to adjust the sliders so the result looks as close to reality as you perceive it, or simply to your taste. Preferences are subjective by definition.
So I suggest adapting your presets to your own style, depending on the light and using different color profiles.
You won’t need many presets, because you’ll probably reuse the same ones most of the time. Once a preset is saved, it’s always at hand, and in a few clicks your images are ready to share or print.
How to Buy Lightroom
When I wrote this article in 2020, Lightroom came in two versions:
Lightroom CC, a cloud-based version, let you view and work on your photos on computers, phones and tablets, on the web and on Apple TV. It cost US$9.99 per month, with 1 TB of online storage.
Lightroom Classic CC was the software installed on your computer. It also cost US$9.99 per month, and the plan included Adobe Photoshop but only 20 GB of online storage, since photos are stored on your computer anyway.
2026 update: Adobe has dropped “CC” from the names: the apps are now called Lightroom and Lightroom Classic. Since January 2025, the Lightroom plan (1 TB) also includes Lightroom Classic, while the 20 GB Photography plan (Lightroom Classic + Photoshop) is no longer offered to new customers; to get Lightroom and Photoshop together, Adobe points new customers to the 1 TB Photography plan. Prices have changed since 2020 (source).
See all Lightroom plans on Adobe’s website.
Get a Fuji Camera
If one thing keeps my passion for photography alive, it’s shooting with a Fujifilm camera.
For many years, I have used Fuji’s X100 series: first the Fuji X100T (3rd generation), then the Fuji X100F (4th generation), my camera when I wrote this article. The Fuji X100V (5th generation) came out in 2020, and I was already tempted to upgrade. My X100F is the ideal camera for my travels.
Unlike the Sony, Olympus, Canon and Nikon cameras I owned before, I never get tired of shooting with my Fuji. The X100 series was designed to be fun to use. On top of Fuji’s beautiful colors, it offers excellent ergonomics and great image quality in a compact body.
Its fixed 35mm-equivalent lens does limit your shooting options somewhat. With the Fujinon WCL wide conversion lens, which widens it to 28mm, it becomes versatile in almost any situation.
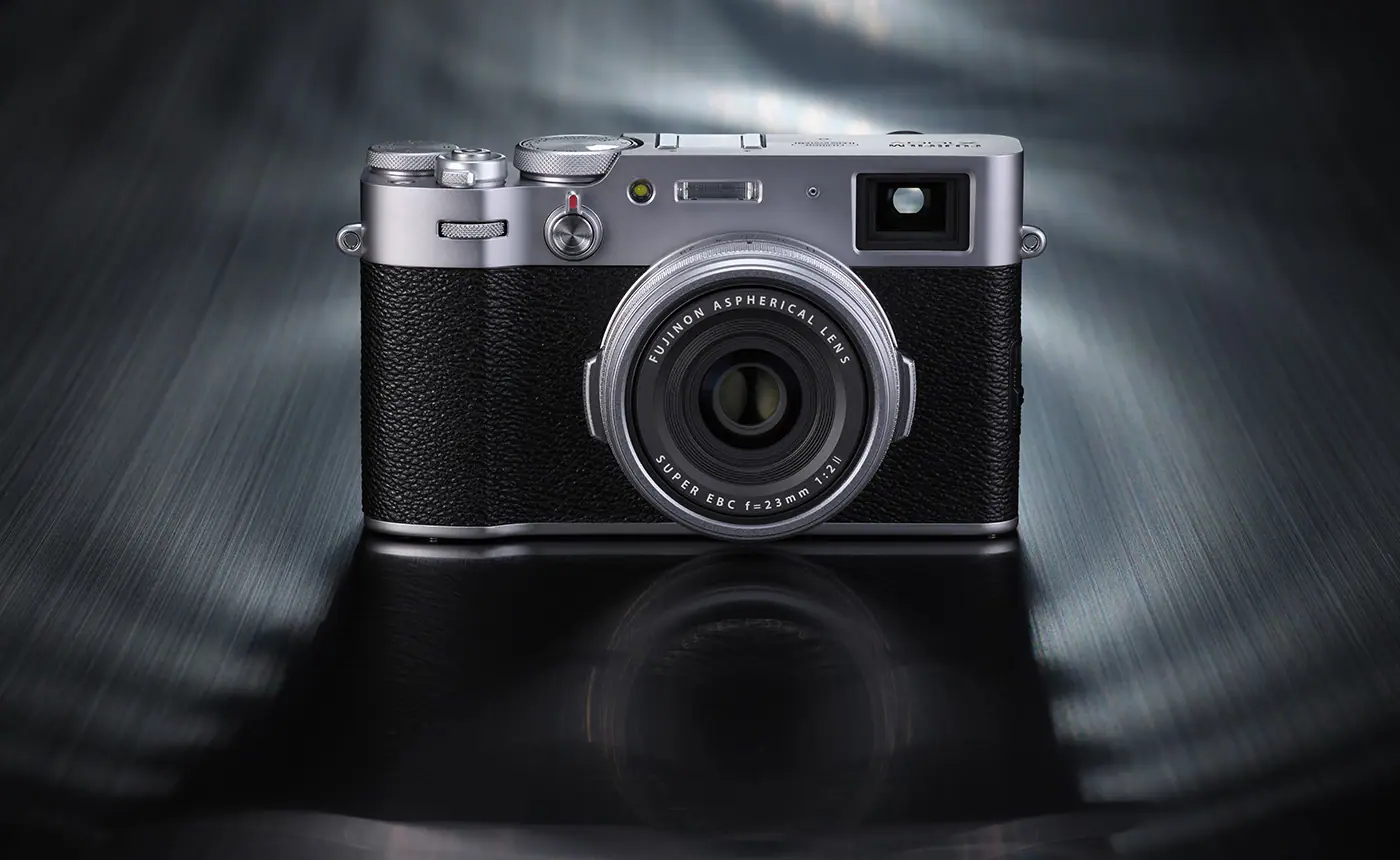
If a fixed lens is a deal-breaker for you, I recommend the Fuji X-Pro2, the interchangeable-lens equivalent of the X100F. The Fuji X-Pro3 is the X100V’s counterpart.
Conclusion: Is Lightroom Worth It for Travel Photos?
Lightroom is a first-rate processing program, and it’s easy to see why so many photographers, professionals and amateurs alike, have adopted it. It more than covers the essential needs of most photographers.
If, like me, you want better photos of your travels, start getting familiar with Lightroom now. Your photos will go from pretty to truly beautiful.
Questions travellers ask
Should I shoot travel photos in RAW or JPEG?
RAW stores all the information captured by the sensor, like a film negative, so you can fix exposure and colors later. A JPEG has already been processed and compressed by the camera. I record both and keep only the RAW files I want to process.
What Lightroom settings do you use for travel photos?
My preset uses Highlights -80, Shadows +50, Whites 0, Blacks 0, Clarity +15, Sharpening Amount 70, Noise Reduction Luminance 40, Remove Chromatic Aberration, Enable Profile Corrections, and the Classic Chrome profile on Fuji cameras.
How long does it take to process 100 photos in Lightroom?
Once my photos are selected, it takes me about 15 minutes to process 100 photos, from import to export, or less than 10 seconds per photo.
How do you apply a Lightroom preset to many photos at once?
In the Library module, select all the imported photos, then choose your preset in the Quick Develop panel. Lightroom applies it to every selected photo in one click.
Does this tutorial work in Lightroom or Lightroom Classic?
The modules and panels shown (Library, Develop, Basic, Quick Develop) are those of Lightroom Classic. In the Lightroom app, the same tone sliders are in the Light panel. Since January 2025, the Lightroom plan also includes Lightroom Classic.